RSS

Category Archives: Ubuntu

Enable Crontab Job in ubuntu/Centos

Step1:

List crontab jobs

crontab -l

Step2:

Open and edit crontab

crontab -e

Step3:

copy and past the following comment and replace the exact path.

Example to run every 1 min:

*/1 * * * * /home/user/fileToStart.sh >> /home/user/logfile.log 2>&1

Example to run on 4:01am on January:

01 04 * * * /home/user/fileToStart.sh >> /home/user/logfile.log 2>&1

Layout example:

minute (0-59), hour (0-23, 0 = midnight), day (1-31), month (1-12), weekday (0-6, 0 = Sunday)

01 04 1 1 1 /home/user/fileToStart.sh >> /home/user/logfile.log 2>&1


Leave a comment

Posted by on December 31, 2015 in CentOS, shellscript, Ubuntu


choose java alternatives in ubuntu.

After install Sun java6 in ubuntu. We need to change default one using alternatives command.

sudo update-alternatives --config java
sudo update-alternatives --config javac
sudo update-alternatives --config javaws

Example:

Just type the number to change.

Selection Path Priority Status
------------------------------------------------------------
* 0 /usr/lib/jvm/java-6-openjdk/jre/bin/javaws 1061 auto mode
 1 /usr/lib/jvm/java-6-openjdk/jre/bin/javaws 1061 manual mode
 2 /usr/lib/jvm/java-6-sun/jre/bin/javaws 63 manual mode

Press enter to keep the current choice[*],
                                     or type selection number:2
 
Leave a comment

Posted by on January 10, 2013 in Installations, Ubuntu


Tags: ,

Install Samba in ubuntu to share your folders.

Just run below mentioned command in terminal prompt.

sudo apt-get install samba
chmod 0755 /var/lib/samba
chmod 0755 /var/cache/samba

Follow the steps to share the folder in ubuntu machine.

Step -1:

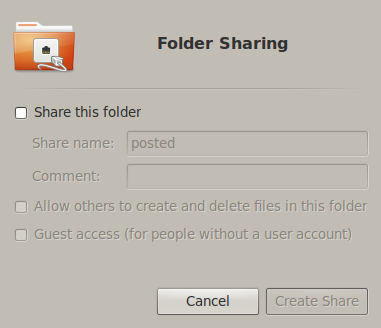
Right-click the folder which you want to share, Then Click “Sharing options” option.

Step-2:

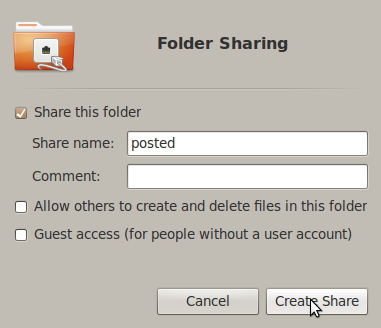
Popup will appear with sharing folder name.

folder-sharing

Step-3:

click-check-&-share

Mark the check box “Share this folder” and  click “Create Share” to share the folder.

 
Leave a comment

Posted by on December 13, 2012 in General, Ubuntu


Tags: ,

Basic steps for git set up

Steps-1:

sudo apt-get install git-core

Steps-2:

git config --global user.name "your git hub username”
git config --global user.email "your git hub email"

Steps-3:

ssh-keygen -t rsa -C "your git hub email"

Steps-4:

ssh-add
It will suggest a default file name id_rsa.pub, accept that
Give a passphrase when it asks one. This will be your passphrase to 
give whenever you commit for first time after starting the machine.

Steps-5:

cd to that file path (cd ~/.ssh) and open that file 
(gedit id_rsa.pub) You will see the ssh key like this,
ssh-rsa AAAAB3NzaC1yc2EAAAABIwAAAQEAvBcneUfRDJm2TYL4MrX9UrBaFus4ebZ
+hvS3SfwIe4Ydn1f8sQ7q4/Hb0l4NB0/yRn3yjJuj5IyFw0QRq1sLUErQAHMKQnJZUO
MsK044MbymF2d6DOExZIvgm4lXxSKeB3JBge+3lPmXatuJbHAQXMDa2kdBRy1ICCbr3
48yZRAAyizEyzSDT3ireFnF5PNxt4E0avx1QrCVZmPX6T6LZ21J5+ObwdvtPomOTOYo
iknrScRrPmTUyG+g6ZdezQhKxOCBd8XKW5NYmcaz4olCVtCwsIuCGpv0Hrh0bpxj14k
Kmv1KVKOA89vuzWtoeGWfZ2xQSSsZhaTTOhrFWV+ImQ== test@test.com

Steps-6:

Login github.com, go to your profile, click Edit your profile, 
then SSH Keys,Give any title and copy paste the ssh key from 
your file, without the email id, that is up to ==
ssh-rsa AAAAB3NzaC1yc2EAAAABIwAAAQEAvBcneUfRDJm2TYL4MrX9UrBaFus4ebZ
+hvS3SfwIe4Ydn1f8sQ7q4/Hb0l4NB0/yRn3yjJuj5IyFw0QRq1sLUErQAHMKQnJZUO
MsK044MbymF2d6DOExZIvgm4lXxSKeB3JBge+3lPmXatuJbHAQXMDa2kdBRy1ICCbr3
48yZRAAyizEyzSDT3ireFnF5PNxt4E0avx1QrCVZmPX6T6LZ21J5+ObwdvtPomOTOYo
iknrScRrPmTUyG+g6ZdezQhKxOCBd8XKW5NYmcaz4olCVtCwsIuCGpv0Hrh0bpxj14k
Kmv1KVKOA89vuzWtoeGWfZ2xQSSsZhaTTOhrFWV+ImQ==

Steps-7: After saving that, come to command line and clone your repository like git clone <repo url> the repo url will be visible when you click the repo link in git hub after logging in.

 
Leave a comment

Posted by on October 1, 2012 in General, Git, Ubuntu


SCP file transfer in linux system

Copy the file from local system to the particular server

$ scp example.txt root@190.162.36.98:/system-path/

In the above command just transfering “example.txt” file in my system to particular server path

Explanation :

example.txt –> file name
190.162.36.98 –> server IP
/system-path/ –> folder path in the server

Download the file from particular server

$ scp root@190.162.36.98:/system-path/example.txt .

Explanation :

scp –> command
190.162.36.98:/system-path/example.txt –> server  IP and folder path in server
. –> dot use to save the file in the current directory

 
Leave a comment

Posted by on July 11, 2012 in General, Networking, Ubuntu


Tags: ,

Start Binary Tomcat6 On Ubuntu / Centos System Start Up

Give the command in terminal prompt:

Step 1: Command to go into init.d folder

cd /etc/init.d

step 2: Create file tomcat6 and edit using below command

root@mycomputer:/etc/init.d# vi tomcat6
(or)  
root@mycomputer:/etc/init.d# gedit tomcat6

Step 3: Paste the below script and give correct JAVA_HOME and CATALINA_HOME and tomcat bin location

#!/bin/sh
###BEGIN INIT INFO
# Provides: tomcat
# Required-Start: $local_fs $remote_fs $network
# Required-Stop: $local_fs $remote_fs $network
# Should-Start: $named
# Should-Stop: $named
# Default-Start: 2 3 4 5
# Default-Stop: 0 1 6
# Short-Description: Start Tomcat.
# Description: Start the Tomcat servlet engine.
### END INIT INFO
# Tomcat 6 init-script
CATALINA_HOME=/home/ideas2it24/apache-tomcat-6.0.32
export CATALINA_HOME
JAVA_HOME=/usr/lib/jvm/java-6-sun-1.6.0.24
export JAVA_HOME
PATH=$JAVA_HOME/bin:$PATH
export PATH
case $1 in
 start)
 sh /home/ideas2it24/apache-tomcat-6.0.32/bin/startup.sh
 echo "tomcat6 started successfully"
 ;;
 stop)
 sh /home/ideas2it24/apache-tomcat-6.0.32/bin/shutdown.sh
 echo "tomcat6 stoped successfully"
 ;;
 restart)
 sh /home/ideas2it24/apache-tomcat-6.0.32/bin/shutdown.sh
 sh /home/ideas2it24/apache-tomcat-6.0.32/bin/startup.sh
 echo "tomcat6 restarted successfully"
 ;;
 *)
 sh /home/ideas2it24/apache-tomcat-6.0.32/bin/startup.sh
 echo "tomcat6 started successfully"
 ;;
 esac
exit 0

Step 4: Permission to the script, Give the following command

For Ubuntu:
 root@mycomputer:/etc/init.d# chmod 751 tomcat6
For centOs:
 chmod +x tomcat

Step 5:Now make the script executable Give following command

For Ubuntu:
 root@mycomputer:/etc/init.d# update-rc.d tomcat6 defaults
For CentOs:
 chkconfig --add tomcat

Step6: To Start / Stop / Restarting tomcat6

to start /etc/init.d/tomcat6 start
to stop /etc/init.d/tomcat6 stop
to restart /etc/init.d/tomcat6 restart

Another Script:

Instead of Step3  script we can use below script

# vi /etc/init.d/tomcat6
#!/bin/sh
# Tomcat 6 init-script
### BEGIN INIT INFO
# Provides: tomcat
# Required-Start: $local_fs $remote_fs $network
# Required-Stop: $local_fs $remote_fs $network
# Should-Start: $named
# Should-Stop: $named
# Default-Start: 2 3 4 5
# Default-Stop: 0 1 6
# Short-Description: Start Tomcat.
# Description: Start the Tomcat servlet engine.
### END INIT INFO
export JAVA_HOME=/usr/lib/jvm/java-6-sun-1.6.0.13
export CATALINA_HOME=/usr/local/apache-tomcat-6.0.20
export PATH=$JAVA_HOME/bin:$PATH
start_tomcat6=/home/ideas2it24/apache-tomcat-6.0.32/bin/startup.sh
stop_tomcat6=/home/ideas2it24/apache-tomcat-6.0.32/bin/shutdown.sh
start() {
 echo "Starting tomcat: "
 su -c ${start_tomcat6} tomcat
 echo "done."
}
stop() {
 echo "Shutting down tomcat: "
 ${stop_tomcat6} tomcat
 echo "done."
}
# See how we were called
case "$1" in
 start)
 start
 ;;
 stop)
 stop
 ;;
 restart)
 stop
 sleep 2
 start
 ;;
 *)
 echo "Usage: $0 {start|stop|restart}"
esac
exit 0
 
4 Comments

Posted by on July 5, 2012 in CentOS, General, Tomcat, Ubuntu


Tags: , ,

Basic Unix Shell commands

Create Directory Command:

Don’t forget, UNIX is case sensitive, UPPER CASE directory names are considered to be different from lower case directory names.

mkdir test2    creates a subdirectory called test2
mkdir /tmp/test2    makes a directory called test2 the /tmp directory
rmdir test2    removes an empty directory called test2

NOTE : The rmdir command will remove a directory only when empty. To remove a full directory and all it’s contents, use the below command.

rm -r directory_name

Shutdown Command:

The shutdown command can be used to turn off or reboot a computer. Type the command as follows to shutdown server / computer immediately:

Login as root user and type the command in terminal prompt

$ shutdown -h now
OR
$ shutdown -h 0

Shutdown compute at specific time, To shutdown computer at 6:45pm.

$ shutdown -h 18:45 "Server is going down for maintenance"

At 6:30pm message will go out to all user and 6:45 system will shutdown.

Please note that you can also use halt or poweroff or reboot command for stopping and restarting the system:

$ halt
OR
$ poweroff

Reboot computer:

$ reboot
OR
$ shutdown -r 0

Remove file / directory command:

Remove command deletes files in a directory.  Remove command will not produce an output unless you have an error.

NOTE: There is no “undelete” command in UNIX,  once you delete a file, it is gone (unless it is on a backup tape).  Because of this, the rm command on CMGM and PMGM will ask you if you really want to delete a file before it goes ahead and does it.

Most UNIX commands have a variety of additional command modifiers that can be used to change the output. For example, if you typed

rm -r *

you would delete recursively the contents of a directory. This means the contents of a directory and all directories and files under it.

rm *    delete everything in a subdirectory
rm *.txt    remove only files with a .txt on the end
rm data*    remove only files that start with the word "data"
rm -r dir2    removes everything in the subdirectory "dir2"

Copy file / folder command:

Copy command lets you copy a file from one location to another on a UNIX machine.

cp -r * /tmp   copy everything in the directory to the /tmp directory
cp file1 file2    copy file1 to a file called file2
cp file1 /tmp     copy file1 to the /tmp directory
cp file1 ~smith    copy file1 to the home directory of "smith"

Move file / folder command:

move command is similar to the copy command, except it copies the file and deletes the original.

mv file1 file2    rename file1 to the name file2.
mv file1 /tmp    move file1 to the /tmp directory.
mv file1 ~sathu    move file1 to the home directory of "sathu".
mv * /tmp    move everything in the directory to the /tmp directory.
mv dir2 /tmp move the directory called dir2,and everything in it,
 to the /tmp directory.
 
Leave a comment

Posted by on July 4, 2012 in CentOS, General, Ubuntu


Tags: , , , , , ,

Install apache2 on ubuntu

Give the below mentioned comment in terminal prompt:

sudo apt-get install apache2

start / stop command:

sudo /etc/init.d/apache2 start
sudo /etc/init.d/apache2 stop
sudo /etc/init.d/apache2 restart


Leave a comment

Posted by on July 4, 2012 in Apache, Installations, Ubuntu


Tags: ,

Ubuntu – Movie Player Streaming for mp3

If you find a problem in streaming mp3 files in Movie Player, that is not able to rewind or forward mp3 files and it simply displayes, streaming, then you need to install gstreamer
sudo apt-get install gstreamer0.10-ffmpeg gstreamer0.10-fluendo-mp3

 
Leave a comment

Posted by on February 27, 2012 in Ubuntu


Tags: , ,

waiting apache2: Could not reliably determine the server’s fully qualified domain name, using 127.0.1.1 for ServerName

When you start apache, you may get this as an error or warning, to avoid this, open file

sudo gedit /etc/apache2/httpd.conf and add this line

ServerName localhost

then restart, sudo /etc/init.d/apache2 restart

 
1 Comment

Posted by on February 15, 2012 in Apache, Ubuntu


Tags: ,